All-in-one and Cloud-Supported Maker Solution: Nuvoton

Introduction
Hi, this is David Tseng of CAVEDU Education. I am happy to introduce you guys a new suggestion of maker board, Nuvoton Numaker-PFM-M487. If you are looking for a board with rich interfaces and ready-to-use cloud services, you definitely want to try this.
About M487
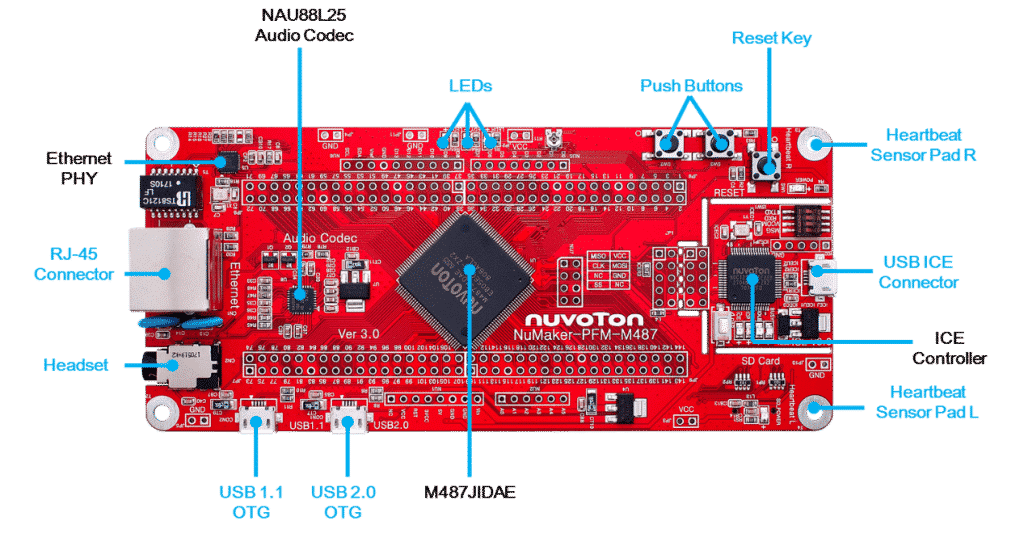
The NuMaker-PFM-M487 dev board is based on an ARM® Cortex® M4 MCU and has very rich peripherals including high speed/full speed USB OTG, SD card interface, Ethernet, audio codec and more, as shown in the figure below:

Despite of the complete interfaces, you may also be interested in the IDE and the eco system. From the maker point of view, you might be somehow unfamiliar (I do!) while you find that this board cannot be programmed from the Arduino IDE. However, the NuMaker-PFM-M487 still provides an Arduino UNO compatible interface for users to develop the specific function with any of existing Arduino sensors and modules.

Along with other primary IDE like Keil and IAR, the NuMaker-PFM-M487 is specially designed to support the ARM® Mbed™ IoT Device Platform for various IoT applications. With many useful learning materials and ready-to-use code templates, you can start your project even faster!
The technical features of the NuMaker-PFM-M487 are listed below:
| Features | On-board peripherals |
|---|---|
| • M487JIDAE MCU • ARM® Cortex®-M4F core running up to 192 MHz • Supports DSP extension • 512 Kbytes Flash memory • 160 Kbytes embedded SRAM • SPI (4) • I2C (3) • I2S (1) • UART (6) • High speed and Full Speed USB OTG / Host / Device • PWM(32) • ADC (16 x 12bit with mux) • DAC (2 x 12bit) • GPIO • Comparator • CAN(2) | • Button x2 • LED indicator x 3 • Nuvoton NAU88L25 Audio codec • MicroSD card socket • Arduino expansion header • 10/100Mbps Ethernet Port |


Hardware setup
This section will show you how to complete your first NuMaker LED blink example with ARM Mbed OS, let’s begin!
1. Get the parts ready
Prepare the parts below:
- NuMaker-PFM-M487 dev board, 1
- LED module, 1
- Micro USB OTG connect wire, 1
- PC (with Windows OS) with network connection to access Mbed OS online IDE, 1
2. Driver setup
Download the Nu-Link Driver from here and install with default settings. After installation, connect your NuMaker-PFM-M487 dev board to the PC with the micro-USB wire, it should be recognized as a disk-drive named as “NuMico-MCU” on your PC.
3. Connect the LED
We use a well-known Arduino example here, LED blink. As mentioned earlier, the NuMaker-PFM-M487 provides an Arduino UNO compatible interface, you can easily connect a LED into the GND and D13 pin, as shown in the image below:

First Hello world LED
Please follow the steps below to finish your first C++ example on the Mbed website:
Step 1:
Visit the Mbed OS website. Click the top-right icon to sign-in or register a free account.

Step 2:
After logged in, click the [Compiler] icon to enter the online compiler interface. We are going to import the NuMaker-PFM-M487 board and finish the first LED blink program in here.
Step 3:
Since we have not specified which board we are going to use, click the [No device selected] on the top-right of the Compiler page and click the [Add board] icon, this will open the platform page.


Step 4:
Here we can see all boards supported in the Mbed OS. Search for “numaker”, you should see the results below, click the [NuMaker-PFM-M487] icon, this will open the page of this board.


Step 5:
In the M487 page, you can find the detailed information of this board and many starter examples from the right-hand side column.

Click the [Add to you Mbed Compiler] to add this board into your compiler.

Step 6a:
Back to your compiler page, you can see the [NuMaker-PFM-M487] icon. Click [New] and select [mbed-os-example-blinky] in the Template dropdown menu. This will import the example into your compiler directly.


Step 6b:
You can also do the same thing in the M487 page. From the [Example Program] section of the M487 page, find the example you are interested in, click the example name, click the [Import into the compiler] and finally the [Import] icon on the prompt window.
For the [mbed-os-example-blinky] example, please visit the page.


Step 7:
Yeah, the example project is here, including three items: main.cpp, README.md and mbed-os library. Click the main.cpp to view the C++ code in the main window.


/* mbed Microcontroller Library
 * Copyright (c) 2019 ARM Limited
 * SPDX-License-Identifier: Apache-2.0
 */

#include "mbed.h"

// Blinking rate in milliseconds
#define BLINKING_RATE 500

int main()
{
#ifdef MBED_MAJOR_VERSION
  printf("Mbed OS version %d.%d.%d\r\n\n", MBED_MAJOR_VERSION, MBED_MINOR_VERSION, MBED_PATCH_VERSION);
#endif
  // Initialise the digital pin LED1 as an output
  DigitalOut led(LED1);

  while (true) {
   led = !led;
   ThisThread::sleep_for(BLINKING_RATE);
  }
}
Step 8:
The main.cpp should be quite self-explanatory. Click the [Compile] icon to compile this project. After that, the compiled file will be downloaded to your PC as .bin extension. For our LED example, it should be “mbed-os-example-blinky.NUMAKER_PFM_M487.bin”.


Step 9:
Drag the .bin file into the “NuMicro-MCU” disk drive (ya, it should appear when you connect the dev board to your PC). You should see the LED light up for 0.5 second and light off for another 0.5 second.
Challenge in 5 minutes
1. Modify the LED pin to another pin (e.g., D6), modify the code and make it blink accordingly.
2. Modify the BLINKING_RATE (e.g., 200) and check the difference.
3. Get another LED and make two LEDs light on and off in turn.
More examples you can try
More info
- https://www.nuvoton.com/products/microcontrollers/arm-cortex-m4-mcus/m487-ethernet-series/?tab=4
- https://docs.aws.amazon.com/zh_tw/freertos/latest/userguide/getting-started-nuvoton-m487.html
- 新唐 NuMaker-IoT-M487 使用 Mbed OS – 連接 Microsoft Azure ( 11 )
- Nuvoton Machine Learning Speech Recognition Solution – implement on NuMaker-PFM-M487 platform
- 新唐 NuMaker-IoT-M487 – step by step 讓你了解如何運行 Mbed OS(1)
- 支援多種雲服務的 NuMaker 物聯網平台
Author
Dr. David Tseng, CAVEDU Education, MIT CSAIL Visiting Scientist.


