Home Automation Using NuMaker-IoT-M2354 & FreeRTOS
1. Introduction
IoT stands for the Internet of Things. It refers to the network of physical devices that are embedded with sensors, software, and connectivity, allowing them to collect and exchange data over the Internet. These interconnected devices can communicate and interact with each other to achieve various functions like home automation, Industrial automation, etc.
In this article we are going to explore how IoT is transforming the home automation segment and how Nuvoton’s offering NuMaker-IoT-M2354 and FreeRTOS (Real-Time Operating System) can help in automating things around you in your daily life.
1.1 Home Automation

Just imagine the things you do after you wake up.
Wakeup → Refresh → Have Breakfast → Leave to work
Considering the scenarios and we are trying to automate a few things in each of the activity mentioned above.
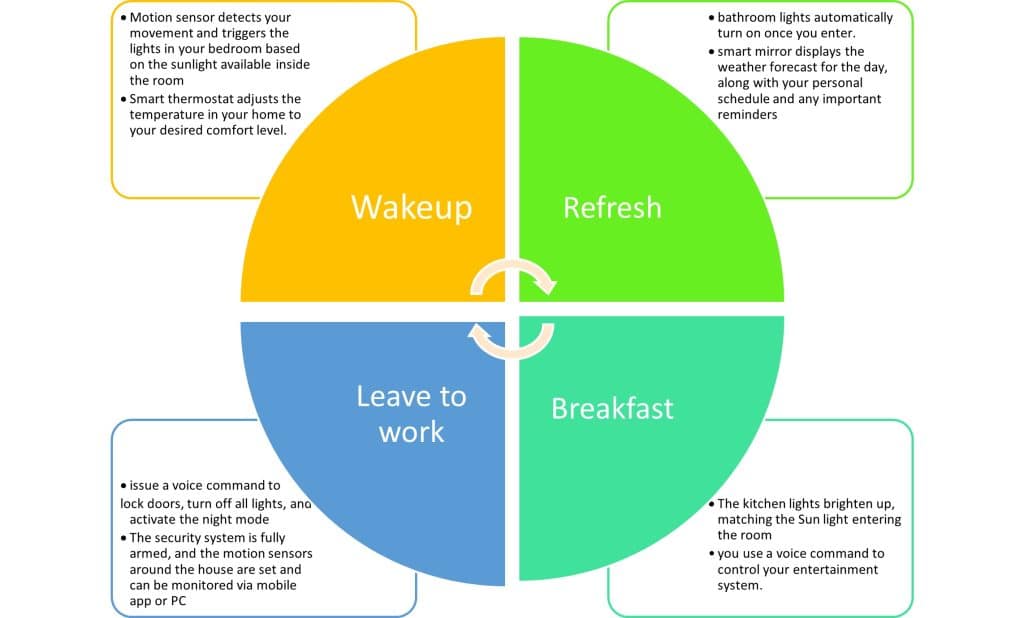
In-order to achieve all the above mentioned automations, the home automation system typically consists of various components and technologies working together to automate and control different aspects of a home which will be explained in system architecture section.
1.2 Overview of Nuvoton NuMaker-IoT-M2354
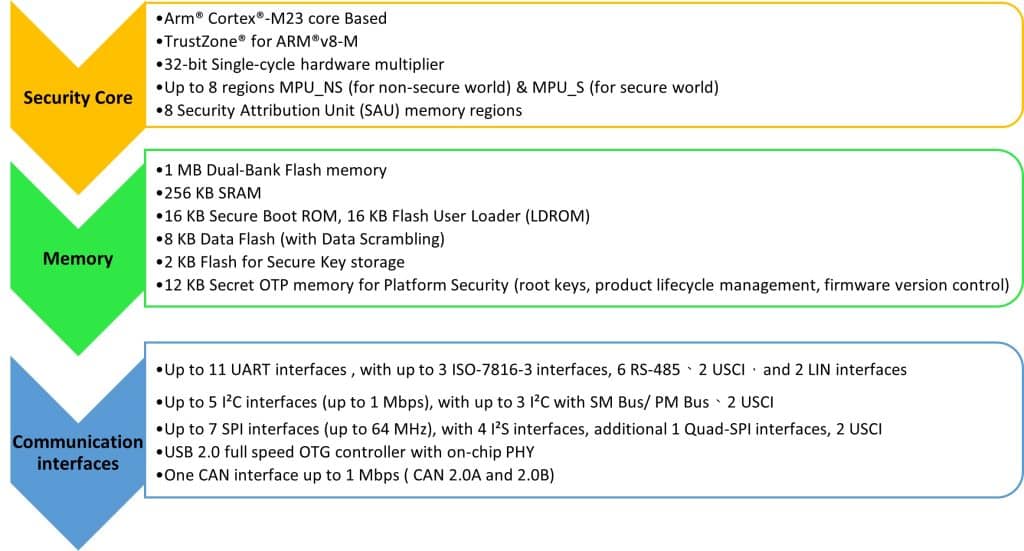
Nuvoton NuMaker-IoT-M2354 is a development board specifically designed for IoT (Internet of Things) applications. It features an Arm Cortex-M23 microcontroller and provides various connectivity options, making it suitable for building IoT devices and systems. Here’s an overview of the key features and capabilities of the NuMaker-IoT-M2354.


Key Features of Nuvoton’s M2354 Series Microcontrollers
2. Components of the home automation system
- Sensors:
o Motion sensors: Detect motion and occupancy in different areas of the house.
o Light sensors: Measure ambient light levels to adjust lighting accordingly.
o Temperature sensors: Monitor the temperature in different rooms or zones. - Actuators:
o Lights: Control the on/off state, brightness, and colour of lights in various rooms.
o HVAC system: Control heating, ventilation, and air conditioning to maintain desired temperature levels.
o Motorized blinds/curtains: Open or close blinds/curtains based on user preferences or automated schedules.
o Appliances: Control smart appliances such as coffee machines, ovens, washing machines, etc.
o Door locks: Lock or unlock doors remotely or automatically based on user presence or schedules. - Control Hub/Gateway:
o Central control unit: Acts as the brain of the home automation system, receiving inputs from sensors and processing them to trigger appropriate actions.
o Connectivity: Provides connectivity options like LoRa, Wi-Fi, Zigbee, or other protocols to communicate with various devices. - User Interfaces:
o Mobile apps: Allow users to control and monitor the home automation system remotely through smartphones or tablets.
o Voice assistants: Enable voice commands for controlling devices and accessing information.
o Wall-mounted control panels: Physical control panels placed in different areas of the house for quick access and control. - Communication Network:
o Local network: Connects all the smart devices and control hub within the house.
o Internet connection: Enables remote access and control of the home automation system through mobile apps or cloud services. - Cloud Services:
o Remote access: Provides access to the home automation system from anywhere through the internet.
o Data storage and analysis: Stores data from sensors and devices for historical analysis and insights.
o Firmware updates: Allows updating device firmware remotely. - Security:
o Cameras: Capture video footage for surveillance and monitoring purposes.
o Security systems: Intrusion detection, alarms, and notifications to ensure home security.
o Authentication and encryption: Secure communication between devices and control interfaces.
2.1 Role of Nuvoton NuMaker-IoT-M2354 in Home Automation

NuMaker-IoT-M2354 development board can support FreeRTOS, which can be used to create robust and scalable platform for developing home automation applications. NuMaker-IoT-M2354 board offers the required connectivity, processing power, and peripheral interfaces to interface with various components in your home automation system while FreeRTOS provides the necessary real-time capabilities, task management, and inter-task communication features.
FreeRTOS is an open-source operating system designed for embedded systems and real-time applications. It provides task scheduling, inter-task communication, and synchronization mechanisms, allowing developers to build complex applications with multiple concurrent tasks. FreeRTOS can be used with the Nuvoton NuMaker-IoT-M2354 microcontroller board to enhance its capabilities and enable real-time multitasking.
The example below explains how NuMaker-IoT-M2354 can be interfaced with different sensors and relay modules to achieve the home automation. Consider a small system as in figure 5, the sensors like temperature, LDR, gas and motion sensors are connected to Numaker-IoT-M2354 development board and based on these inputs we can control the relay which can be used for turning on or off functions like lights, fans, etc. This is just an example to show how we can achieve home automation. For turning your entire home into smart home, it requires lot of integrations and algorithms which can be achieved through NuMaker-IoT-M2354 as well.
Note: The schematics shown in this document are provided for reference purposes only. If you use any part of these schematics as a basis for hardware design, do so at their own risk; TECHDesign does not assume any liability for such a hardware design.
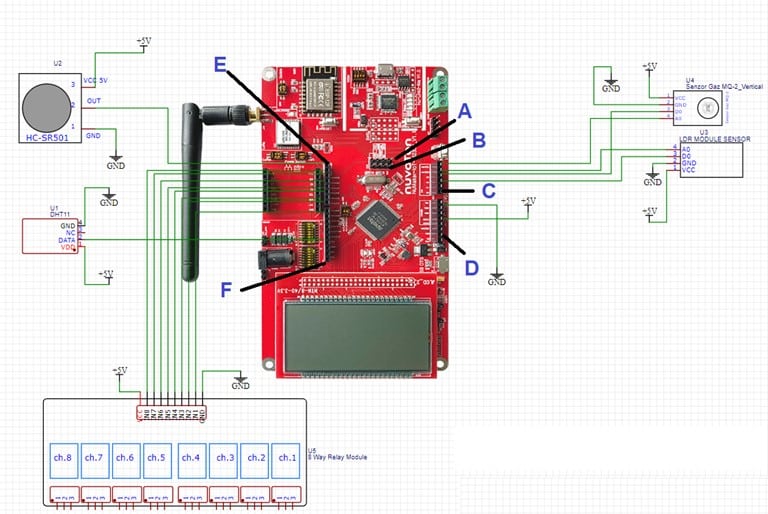
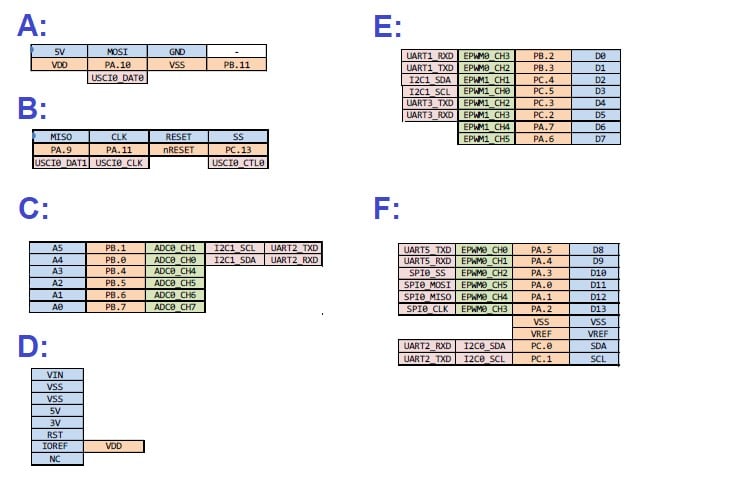
Pin mapping
| Pin No. | Pin Configured as | Function |
|---|---|---|
| NU3.1 | PB.2 | PIR Sensor Input |
| NU3.2 | PB.3 | Relay CH.1 |
| NU3.3 | PC.4 | Relay CH.2 |
| NU3.4 | PC.5 | Relay CH.3 |
| NU3.5 | PC.3 | Relay CH.4 |
| NU3.6 | PC.2 | Relay CH.5 |
| NU3.7 | PA.7 | Relay CH.6 |
| NU3.8 | PA.6 | Relay CH.7 |
| NU4.1 | PA.5 | Relay CH.8 |
| NU4.6 | PA.2 | Temperature sensor Input |
| NU2.6 | PB.1 | Gas sensor Analog input |
| NU2.5 | PB.0 | LDR sensor Analog input |
| NU2.4 | PB.4 | Gas sensor Digital output |
| NU2.3 | PB.5 | LDR sensor Digital output |
| NU1.7 | VSS | GND |
| NU1.5 | 5V | 5V |
2.2 Sensors Integration:
In order to automate any activity, we need to gather data from the environment and make intelligent decisions based on that information.
The NuMaker-IoT-M2354 offers several interfaces that can be utilized for sensor integration.
- General-Purpose Input/Output (GPIO) Pins
- Inter-Integrated Circuit (I2C)
- Serial Peripheral Interface (SPI)
- Analog-to-Digital Converter (ADC)
As shown in figure 5, below listed sensors are commonly used sensors and how they can be integrated with the NuMaker-IoT-M2354.
- Temperature and Humidity Sensor (DHT11): The DHT11 sensor provides real-time temperature and humidity readings. It utilizes the serial data for communication. By connecting the DHT11 sensor’s data lines to the NuMaker-IoT-M2354, you can retrieve temperature and humidity data for monitoring and control.
- Motion Sensor (Passive Infrared – PIR): PIR motion sensors detect human movement using infrared radiation. They usually provide a digital output signal. By connecting the output pin of the PIR sensor to a GPIO pin on the NuMaker-IoT-M2354, you can detect motion and trigger actions accordingly.
- Light Sensor (LDR): Light-dependent resistors (LDRs) are used to measure ambient light levels. They generate analog output voltage proportional to the light intensity. By connecting the LDR to one of the ADC pins on the NuMaker-IoT-M2354, you can convert the analog voltage to a digital value and utilize it for controlling lighting systems or implementing energy-saving features.
- Gas Sensor (MQ-2): Gas sensors, such as the MQ-2, detect the presence of gases like LPG, propane, and methane. They provide analog output signals. By connecting the output of the MQ-2 gas sensor to an ADC pin on the NuMaker-IoT-M2354, you can measure the gas concentration and implement safety measures like gas leak detection and alerts.
2.3 Actuators Integration
Once we gather the information from the environment through sensors as in section 2.2, we need actuators such as relays, motor controllers, or electronic switches to enable remote control and automation. Factors such as power consumption, size, compatibility, and environmental considerations should be taken into account.
Below are some commonly used actuators in IoT applications:
- Relays
- Solenoids
- Motors
a. DC Motors
b. Servo Motors
c. Stepper Motors - Audio Devices
a. speakers
b. buzzers
3 Guidelines for Home automation using NuMaker-IoT-M2354 with FreeRTOS
Below are the steps to be followed to build the home automation system:
• Define System Requirements: List down all the appliances you want to control for example controlling lights, appliances, HVAC systems, security cameras, and more.
• Choose Hardware Components: The NuMaker-IoT-M2354 microcontroller with its built-in Wi-Fi capability and compatibility with FreeRTOS. Additionally, consider other hardware components such as relays, sensors (e.g., temperature, motion), actuators, and any devices you want to control.
• Set Up Development Environment: Install the software tools and libraries for home automation system which includes the development environment for the microcontroller (e.g., Keil MDK) and the FreeRTOS operating system.
Download & Configure FreeRTOS → Configure memory layout → Configure Interrupt handling → Initialize FreeRTOS kernel
- Download & Configure FreeRTOS: Download the FreeRTOS source code from the official FreeRTOS website (https://www.freertos.org).Choose the appropriate version compatible with the ARM Cortex-M23 architecture, which is the core of the NuMaker-IoT-M2354. Open the FreeRTOS configuration file and modify it according to your requirements.
Here are some key configurations to consider:- Set the correct clock frequency and tick rate for the microcontroller.
- Define the number of priority levels and interrupt priority grouping.
- Adjust the stack sizes for each task.
- Enable or disable specific features such as software timers, dynamic memory allocation, or idle mode based on your needs.
- Add the required FreeRTOS source files to your project. This includes the kernel source files, port-specific files for the ARM Cortex-M23, and any other components you plan to use.
- Configure Memory Layout: Configure the memory layout of the microcontroller to allocate specific regions for the FreeRTOS kernel. This includes stack memory for tasks and the FreeRTOS heap, if dynamic memory allocation is enabled. Refer to the NuMaker-IoT-M2354 datasheet and documentation for memory layout details.
- Configure Interrupt Handling: Configure the interrupt handling mechanism in FreeRTOS to work with the microcontroller’s interrupt controller by modifying the port-specific code to correctly handle interrupt priorities and context switching during interrupts.
- Initialize FreeRTOS Kernel: Initialize the FreeRTOS kernel by calling the necessary initialization functions like creating the idle task, starting the scheduler, and enabling interrupts.
• Implement Communication: using Wi-Fi or your preferred mode of communication with slave devices to establish communication between the NuMaker-IoT-M2354 and other devices in your home automation system. Then once all the slave devices are connected start configuring the Wi-Fi module, establish a connection to your home network, and implement protocols such as MQTT for communication.
• Create Task Management: using FreeRTOS which provides a task-based programming model, define multiple tasks to handle different functionalities of your home automation system. Identify the tasks required for your system (e.g., sensor data collection, actuator control, user interface) and create them using FreeRTOS APIs.
• Implement Sensor Integration: As mentioned in section 2.2, connect sensors to the microcontroller to gather data and pass the data to the relevant tasks for processing.
• Control Actuators: As mentioned in section 2.3, connect actuators such as relays or motors to the microcontroller to control various devices in your home. Implement the necessary interfaces to control these actuators (e.g., GPIO, PWM) and create tasks to handle actuator control based on sensor inputs.
• Implement Automation Logic: Define the automation logic based on your requirements. As shown in Figure. 2 you can create logic based on the day-to-day activities you do.
• User Interface: In order to easily access to the system, implement the necessary protocols and interfaces to enable user interaction and allow remote control of devices. This could be a web-based interface, a mobile app, or even voice commands using speech recognition.
• Testing and Debugging: Thoroughly test your system to ensure its functionality and reliability. Debug any issues that arise during testing and make necessary adjustments.
• Deployment: Once you are satisfied with the performance and stability of your home automation system, deploy it in your home environment.
Refer to the FreeRTOS documentation and Nuvoton’s documentation, for the detailed instructions, examples, and best practices for integrating FreeRTOS into your project
| Part Number | Description |
|---|---|
| NuMaker-IoT-M2354C | Development board NuMaker-IoT-M2354U for the LoRa band 433 MHz |
| NuMaker-IoT-M2354U | Development board NuMaker-IoT-M2354U for the LoRa band 915 MHz |
| Part Number | Description | Package |
|---|---|---|
| M2354LJFAE | Cortex M23 MCU 1024 KB Flash | LQFP48 |
| M2354SJFAE | LQFP64 | |
| M2354KJFAE | LQFP128 |
5 Conclusion
Actual implementation and complexity of a home automation system can vary based on individual needs and preferences. With its powerful capabilities, secure connectivity, and easy customization, the NuMaker-IoT-M2354 simplifies the process of developing and managing smart home automation systems. This article is just an basic overview on how we can achieve to automate things around us.
Please contact TECHDesign team to know more details on the M2354 Microcontroller series offerings from Nuvoton and support if needed.
➡ Read more articles about Nuvoton M2354 series.


